Often the data in your spreadsheets is not according to your needs, so you may need to replace some strings, split some text, merge cells or concatenate data to format the data as per your needs.
In this tutorial, we are going to learn different ways to concatenate cells, columns, and ranges in excel. So, without further ado, let’s dive right in.

What is Concatenation?
Concatenation in Excel means combining data from multiple columns into a single column. Let’s try to understand concatenation with a simple example.

As seen in the screenshot above, we have a spreadsheet with ‘First name’ and ‘Last name’ columns. Now let’s say, we want to have another column ‘Full Name’.
So to generate data for the ‘full name’ column, we can make use of a string concatenation function such as CONCATENATE to combine ‘First name’ and the ‘Last name’ and show that result in the ‘Full Name’ column.
Besides the obvious CONCATENATE function, there are a few other inbuilt functions and operators that Excel provides to concatenate data. In this post, we are going to have a look at all those functions and operators and try to understand them.
But before going ahead, let’s try to understand the difference between concatenation and merging.
How Concatenation Differs from Merging Cells
Although both the operations (concatenating cells and merging cells) look somewhat similar, yet the results they yield are very different.
Merging cells does not mean combining data, it means combining cells. Merging joins two or more cells to form a new, bigger cell, but the merged cell data would only be the left-most cell's data.
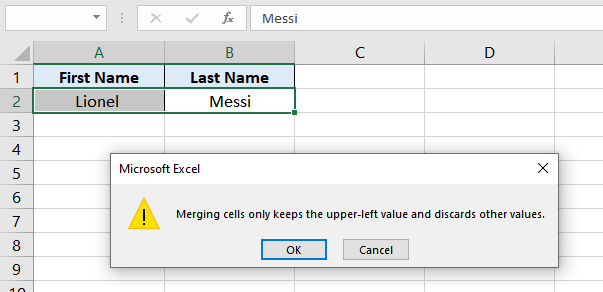
Let’s understand this with an example, as you may see in the screenshot, merging cells will combine the cells by only retaining the left-most value in the merged cell. All the other cell values are discarded.

As you can see above, by merging the First name and Last Name cells we are only left with the First name value (i.e. Lionel) in the merged cell and the Last name value was discarded. On the other hand, concatenation takes data from the selected cells and combines it in a separate cell (where concatenation functions or concatenation operators are used).

CONCAT and CONCATENATE functions In Excel
CONCAT and CONCATENATE are the two functions available in excel for concatenation. CONCAT is a relatively new function that has replaced the older CONCATENATE function from Excel 2019 onwards.
Although, the CONCATENATE function has been made obsolete however it still exists in Excel 2019 and Office 365 for backward compatibility.
Let’s first try to see the syntaxes of both these functions and then we will see some examples:
CONCAT Function
The syntax of the CONCAT function is as follows:
=CONCAT(text1, [text2], ...)Arguments:
text1 – can be a cell reference, cell range, or a text value.text2 – is an optional argument. It can be a cell reference, cell range, or a text value.
CONCATENATE Function
The syntax of the CONCATENATE function is as follows:
=CONCATENATE(text1, text2, [text3], ...)Arguments:
text1 – can be a cell reference or a text value.text2 – can be a cell reference or a text value.text3 – is an optional argument. It can be a cell reference or a text value.
Let’s try to see simple examples of both these functions.

In the above example, we have two input strings, and with the help of CONCAT and CONCATENATE functions, we are joining them to get the same results.
The formulas used in the above example are as follows:
=CONCATENATE(A2," ",B2) //Concatenate
=CONCAT(A2," ",B2) //Concat
In both the above formulas, function arguments, as well as results, are the same.
The functions have 3 arguments – A2 is the cell reference of the first cell to be concatenated. We have passed " " (space) as the second argument to have space between Input1 and Input 2. Finally, B2 is passed as the third argument, which signifies the cell reference of the second cell to be concatenated.
In the above example instead of passing the cell references we could also have passed text values and the result would have been the same.
=CONCATENATE("Lionel"," ","Messi") //would result in Lionel Messi
=CONCAT("Lionel"," ","Messi") //would result in Lionel Messi
Concatenation Operator in Excel (& Operator)
We already discussed two of the concatenation functions above however there is yet another easy way to concatenate cells in excel. With the use of & operator, we can join two strings in excel. Everything that the CONCATENATE function can do, the ampersand (&) can do just as well.
Actually, this method can come in very handy when you have to join only a few strings. But if you are planning to use this method for concatenating several strings, then it can be quite inconvenient as it doesn’t give you the ease of CONCATENATE Function.
Let's recreate the example used above again, but this time with & operator in Excel.

As seen in the screenshot above, the results, in this case, are the same as the CONCATENATE function, but the syntax is different.
Concatenation Operator Syntax
The syntax of using the concatenation operator (&) in Excel is as follows:
=text1&text2&text3&….&textNArguments:
text1 – can be a cell reference or a text value.text2 – can be a cell reference or a text value.text3 – is an optional argument. It can be a cell reference or a text value.
Same as the CONCATENATE function, the concatenation operator can also accept cell references or text values and the result would have been the same.
="Lionel"&" "&"Messi" //would result in Lionel MessiDifference between CONCATENATE, CONCAT and & Operator
All three concatenation methods discussed above produce similar results, but then what are the differences between these three?
Let’s get one thing clear, the key difference between the CONCAT and CONCATENATE functions is that CONCAT can handle cell ranges while the CONCATENATE function cannot.
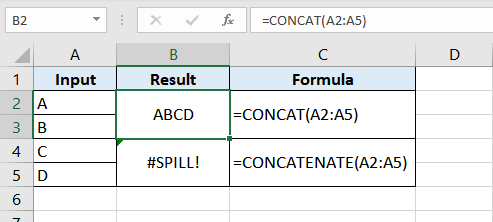
In the above screenshot, we can clearly see that the CONCAT function can work with cell ranges whereas the CONCATENATE function returns a #SPILL! Error.
The concatenation operator (&) also can’t handle the cell ranges. Another major difference between the & operator and CONCATENATE function is that CONCATENATE Function can only join up-to 255 strings whereas the “&” operator doesn’t have any such limitations.
I personally think that 255 is a huge number and no one practically needs to merge 255 strings. So, the difference really boils down to the ease of use. Also, while deciding which way you want to concatenate cells, you should also keep in mind that the CONCATENATE function has been made obsolete and can be removed in future versions of Excel.
Concatenation in Excel using the TEXTJOIN function
TEXTJOIN function was introduced with Excel 2019, it provides another way to combine text from multiple cells into a single cell.
TEXTJOIN function also allows you to pass a range of cells. In addition to this, it also has a parameter that allows ignoring empty values.
One thing that differentiates the TEXTJOIN function from other functions is the out-of-box ability to pass a delimiter parameter.
Before going any further let’s have a look at the syntax of the TEXTJOIN function.
The syntax of the TEXTJOIN function is as follows:
=TEXTJOIN(delimiter, ignore_empty, text 1, [text2], …)Arguments:
delimiter – is the text separator, it can be any text value or a cell reference.ignore_empty – is used for instructing the function to ignore empty cells within the range. You can set its value to TRUE or FALSE, depending on your preference.text 1 – can be a cell reference, cell range, or a text value.[text 2] – is an optional parameter. It can be a cell reference, cell range, or a text value.
Now, let’s try to understand the TEXTJOIN function with an example.

As shown in the above screenshot, the TEXTJOIN function is used for concatenating the values in A2 and B2 cells. The first argument to the TEXTJOIN function is the ‘delimiter’ since in our case we wish to separate the values with a “ “ (space) so we have used that as the delimiter.
The second argument is set to TRUE which means that the function will ignore any empty cells within the given range.
The third and fourth arguments are cell references of A2 and B2 cells. Since the TEXTJOIN function can also accept ranges hence instead of passing two cells we can also pass the entire range as A2:B2 and in both cases result would be the same.
Now, as we have learned about all the approaches to concatenate cells in excel. Let’s try to see some practical examples.
How to Concatenate Two or More Columns With Or Without Delimiters
To concatenate data from multiple columns with a delimiter (like a comma, space, or line breaks) you can use any one of the above-listed functions. In this section, we will see all the three functions and concatenation operator along with different delimiters:
Concatenating Multiple Columns with Delimiter Using the CONCATENATE function
In this example, we have used CONCATENATE function to combine the data from 4 different columns along with several delimiters like comma (“,”), space (“ ”), or line break (newline character).

To use the CONCATENATE function for combining multiple columns the formula would be:
=CONCATENATE(A2,B2,C2,D2) //Concatenating without delimiter
=CONCATENATE(A2,",",B2,",",C2,",",D2) //"," (comma) as delimiter
=CONCATENATE(A3," ",B3," ",C3," ",D3) //" " (space) as delimiter
=CONCATENATE(A4,CHAR(10),B4,CHAR(10),C4,CHAR(10),D4) //linebreak as delimiter
Note 1: To add line breaks or newline characters in your formulas you can make use of the CHAR(10) or CHAR(13):
- CHAR(10): 10 is the ASCII code for line feed for Windows.
- CHAR(13): 13 is the ASCII code for Carriage Return for MAC.
Note 2: To make sure that text is displayed with proper line breaks, you must turn on the "Wrap text" option. To enable wrap text, you can follow these steps.
- Select the cell where you want to apply the line break.
- Press CTRL + 1 and open the cell formatting menu.
- Navigate to the alignment tab and check the "Wrap text" option and click “OK”.
Concatenating Multiple Columns with Delimiter Using the Concatenation Operator "&"
Here instead of the CONCATENATE function, we have used Concatenation Operator “&” to combine the data from 4 different columns along with several delimiters like comma (“,”), space (“ ”), or line break (newline character).
To concatenate two cells using the ampersand (&) is easy and quick, the results can be achieved by sandwiching the delimiters between the two ampersand operators on either side and the cell references as seen in the screenshot above.
But this concatenation method can be quite cumbersome especially if data from many columns need to be combined.

To combine data from multiple columns using the Concatenation Operator the formula would be:
=A2&B2&C2&D2 //Concatenating without delimiter
=A2&","&B2&","&C2&","&D2 //with "," (comma) as delimiter
=A3&" "&B3&" "&C3&" "&D3 //with " " (space) as delimiter
=A4&CHAR(10)&B4&CHAR(10)&C4&CHAR(10)&D4 //with linebreak as delimiter
Concatenating Multiple Columns with Delimiter Using the CONCAT function
In this example, we will try to use the CONCAT function to join data from 4 different columns along with several delimiters like comma (“,”), space (“ ”), or line break (newline character).
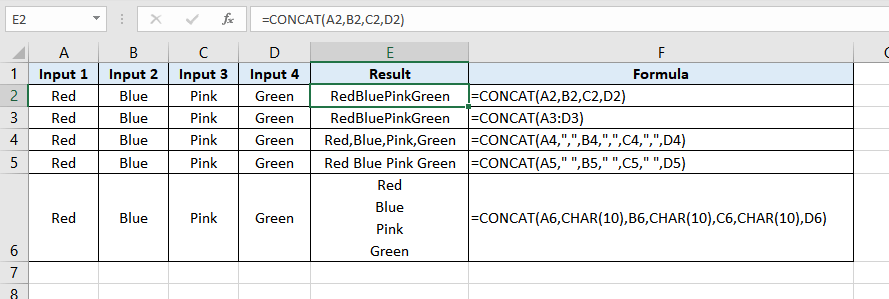
To use the CONCAT function for combining multiple columns, the formula would be:
=CONCAT(A2,B2,C2,D2) //Concatenating without delimiter
=CONCAT(A2:D2) //Concatenating without delimiter, can accept ranges
=CONCAT(A2,",",B2,",",C2,",",D2) //with "," (comma) as delimiter
=CONCAT(A3," ",B3," ",C3," ",D3) //with " " (space) as delimiter
=CONCAT(A4,CHAR(10),B4,CHAR(10),C4,CHAR(10),D4) //with linebreak as delimiter
Concatenating Multiple Columns with Delimiter Using the TEXTJOIN function
Now let’s try to use the TEXTJOIN function (my personal favorite) to join the data from 4 different columns along with several delimiters like comma (“,”), space (“ ”), or line break (newline character).
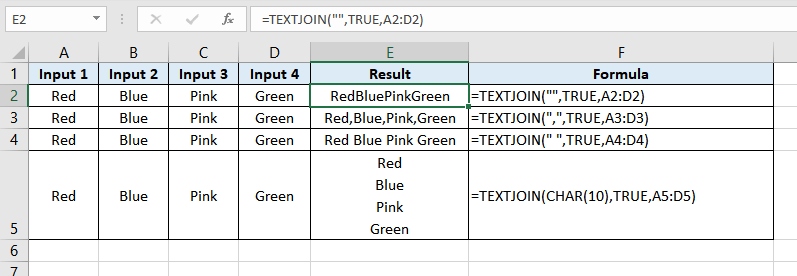
To use the TEXTJOIN function for concatenating multiple columns the formula would be:
=TEXTJOIN("",TRUE,A2:D2) //Concatenating without delimiter
=TEXTJOIN(",",TRUE,A2:D2) //with "," (comma) as delimiter
=TEXTJOIN(" ",TRUE,A3:D3) //with " " (space) as delimiter
=TEXTJOIN(CHAR(10),TRUE,A4:D4) //with linebreak as delimiter
Since the TEXTJOIN function accepts cell ranges so we do not have to manually type the cell reference for each column, this makes the formulas shorter and easier to write, debug and understand.
How to Concatenate a Cell Range With Or Without Delimiters
There are cases when instead of concatenating data from multiple columns you might need to concatenate data from a range of cells. Till now we know that we have two concatenation functions namely – CONCAT and TEXTJOIN that can work with cell ranges.
Let’s try to use these formulas one by one and see how well they support cell ranges.
CONCAT Function with Cell Ranges
CONCAT function can be used with both horizontal and vertical cell ranges, but while using it with cell ranges you are not able to specify delimiters.
Let’s see all this in action.

In the above image, you can see that the CONCAT function works nicely with horizontal cell ranges. To use it with horizontal cell ranges you can use the formula –
=CONCAT(A2:D2) //where A2:D2 specifies the horizontal range of cellsSimilarly, the CONCAT function can also work with the vertical cell ranges as shown in the below image.
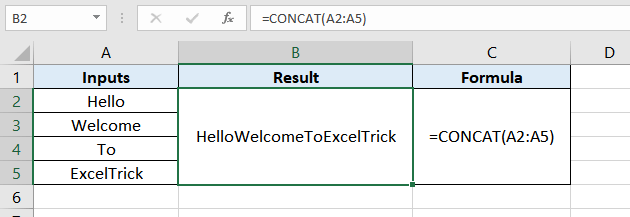
To use it with vertical cell ranges you can use the formula –
=CONCAT(A2:A5) //where A2:A5 specifies the vertical range of cellsCONCAT function also allows you to concatenate two separate cell ranges as shown in the next example.
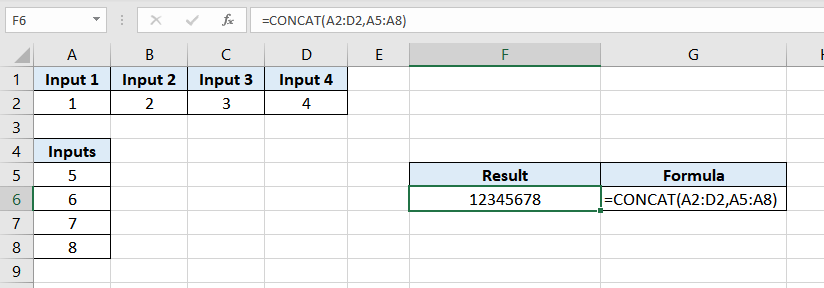
In this case, we have two ranges – A2:D2 (horizontal range) and A5:A8 (vertical range) and with the help of the CONCAT function, we are concatenating the data from these two ranges.
You can use the formula to accomplish this –
=CONCAT(A2:D2, A5:A8) //where A2:D2 is one range and A5:A8 is the second rangeThe only downside of the CONCAT function is – since we are passing the range, we would not be able to supply a delimiter with the function.
TEXTJOIN Function with Cell Ranges
With the TEXTJOIN function, you can concatenate both horizontal and vertical cell ranges. Also, unlike the CONCAT function, TEXTJOIN allows you to use delimiters along with the cell ranges.
Let’s see this with some examples:

In the above image, we can see, how the TEXTJOIN function can be used to combine a horizontal range of cells without a delimiter.
To use the TEXTJOIN function with horizontal cell ranges without separator use the following formula –
=TEXTJOIN("",TRUE,A2:D2) //where A2:D2 is the range to be concatenated.In order to use a delimiter, simply pass the desired delimiter in the first argument to the function as shown in the following image.

So, to use the TEXTJOIN function with horizontal cell ranges with separator use the following formula –
=TEXTJOIN("-",TRUE,A2:D2) //where hyphen/dash is used as the delimiterIn the same way, the TEXTJOIN function can be used for concatenating a vertical range of cells with or without a delimiter.

To use the TEXTJOIN function with vertical cell ranges use the following formula –
=TEXTJOIN("",TRUE,A2:A5) //where A2:A5 is a vertical cell range with no separator=TEXTJOIN("–",TRUE,A2:A5) //where A2:A5 is a vertical cell range with "-" as separator
Like the CONCAT function, the TEXTJOIN function also allows to combine values from multiple cell ranges, but it has one advantage over the CONCAT function that it allows the user to pass concatenation separators/delimiters. Below is an example:
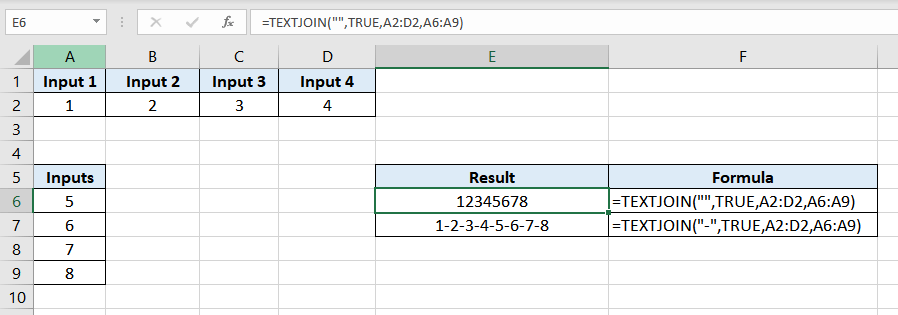
In this example, we have two ranges – A2:D2 (horizontal range) and A6:A9 (vertical range) and with the help of the TEXTJOIN function, we are concatenating the data from these two ranges with and without delimiters.
For this, you can use the formula –
=TEXTJOIN("",TRUE,A2:D2,A6:A9) //A2:D2 & A6:A9 are two cell ranges
=TEXTJOIN("-",TRUE,A2:D2,A6:A9) //A2:D2 & A6:A9 are two ranges with "-" as delimiter
How to Use TEXTJOIN function with Excel 2016 or Lower Versions
Now, we have seen how amazing is the TEXTJOIN function – it supports cell ranges, delimiters, removes blank cells if required. And all these features make it a great concatenation function.
But since it was added only after Excel 2019 so many users who are working with older versions of Excel are not able to use it. For all those users we have a developed a custom UDF (user-defined function) that resembles the TEXTJOIN function.
To add this UDF to your spreadsheet, follow the below steps:
- If you are on Windows, press the keys (ALT + F11). If you are on MAC, press the keys (Opt + F11). This will open the Visual Basic Editor.
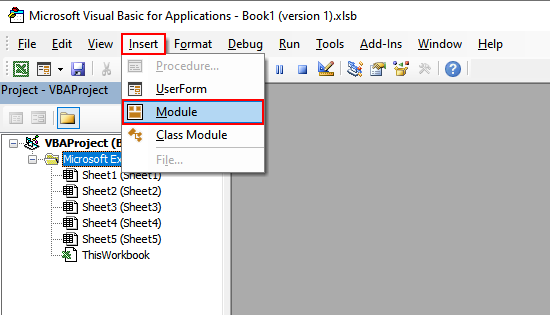
- After the Visual Basic Editor is opened. Go to "Insert" and click the "Module" option as shown in the image. This will insert a module object for your workbook.
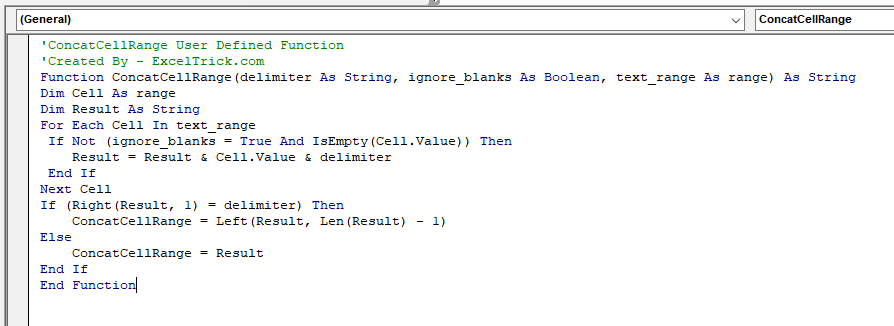
- Now you can copy-paste the following UDF code in the module, save the spreadsheet and you will be ready to use it.
'ConcatCellRange User Defined Function
'Created By - ExcelTrick.com
Function ConcatCellRange(delimiter As String, ignore_blanks As Boolean, text_range As range) As String
Dim Cell As range
Dim Result As String
For Each Cell In text_range
 If Not (ignore_blanks = True And IsEmpty(Cell.Value)) Then
 Result = Result & Cell.Value & delimiter
 End If
Next Cell
If (Right(Result, 1) = delimiter) Then
 ConcatCellRange = Left(Result, Len(Result) - 1)
Else
 ConcatCellRange = Result
End If
End Function
How to Use this ConcatCellRange UDF
The syntax of the ConcatCellRange function is as follows:
=ConcatCellRange(delimiter, ignore_blanks, text_range)Arguments:
delimiter – is the text separator, it can be any text value or a cell reference.ignore_blanks – is used for instructing the function to ignore empty cells within the range. You can set its value to TRUE or FALSE, depending on your preference.text_range – can be a horizontal or vertical range of cells.
In the following example, we have used the ConcatCellRange function with a horizontal range of cells.

In the first case, the UDF is used for concatenating the cells without a separator. While in the second case, the function is used on a horizontal range along with a separator. Finally, the third case depicts the function used with the ability to skip empty cells within the given range.
Lets, see how to use the function with vertical ranges
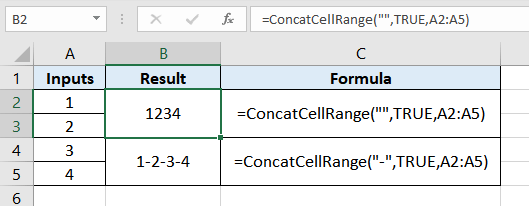
In the above example, the UDF is used with a vertical range from A2:A5, wherein the first case the function is used without a separator whereas in the other case it is used with “-“ (hyphen) as the range separator.
How to Split or Un-Concatenate Columns in Excel
Looking for the opposite of concatenation? If you want to split cells or the data in cells instead of combining, you can use a few different methods which you can find right here.
- Split cells using Flash Fill in Excel
- Split cells using the Text to Columns feature in Excel
- Split cells using Excel Formulas (Mid, Left, Right functions)
So, this was all about concatenating columns, rows, and ranges in excel. Do let us know in case you have any other special tricks or tips related to this.


