In this tutorial, we are dealing with timestamps including dates. If you need to extract date from the timestamp or erase the time component from a date, we will look into a few features and functions to achieve it.
With a present data of timestamps, you may need to single out the dates and you know how Excel tries that you do the least work manually. If you choose functions to remove the time, you can keep the original data and apply the function and get the results in a separate column. If you choose to remove the time using an Excel feature, you can change the original data.
Let’s start on how to remove the time bit of timestamps.

Remove Time from Date in Excel Using Formulas
The date can be singled from the timestamp with formulas. Using formulas for the job, you get to keep the original data and have the results separately.
We will expand on the use of 3 formulas for removing the time; the INT function, the DATE function with YEAR, MONTH, and DAY functions, and the TEXT function. Let’s begin with the first one.
Using the INT Function
The INT function rounds a number down to the nearest integer. If you’re wondering what role integers play with timestamps, we’ll explain below. For now, we will use the INT function as its simplest:
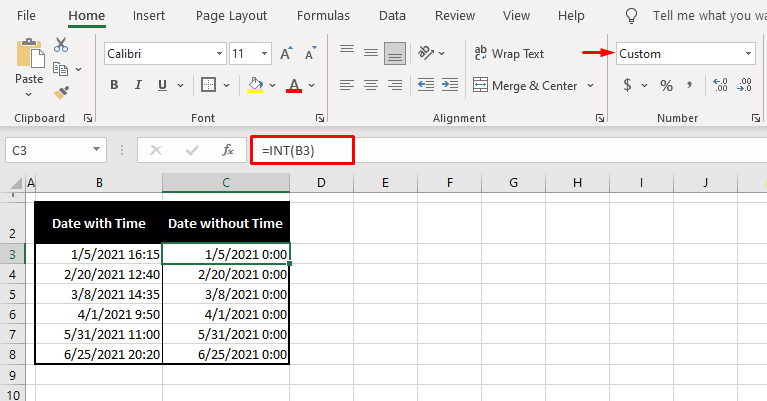
=INT(B3)We have used the INT function with a single argument; a cell reference to the timestamp to round the timestamp down to the nearest integer.
To explain the role of integers, if we were to copy both B3 and C3 and paste their values, we will see a couple of numbers like so:
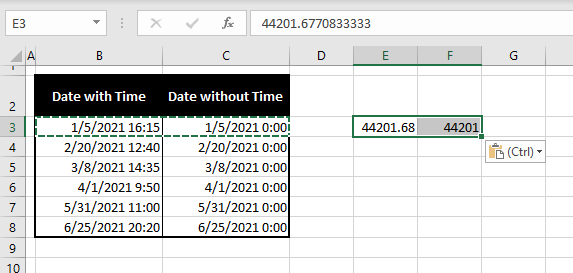
Why? Dates are stored in Excel as serial numbers and time is stored as a decimal. Another proof of this shows if you change the format of any date from Date to General; you will again see a number.
Above, you may have noticed the first value has been pasted as a decimal. 44201 is the integer for the date 1/5/2021 and .68 represents the time 16:15. The INT function has rounded off the number 44201.68 to the nearest integer which is 44201, making the time 0.
The custom format of the cell leaves the 0 to be displayed, which is why the time element of the timestamp has resulted in 0:00 after applying the INT function. Now all that is left is to switch the results to a date format instead of Custom format.
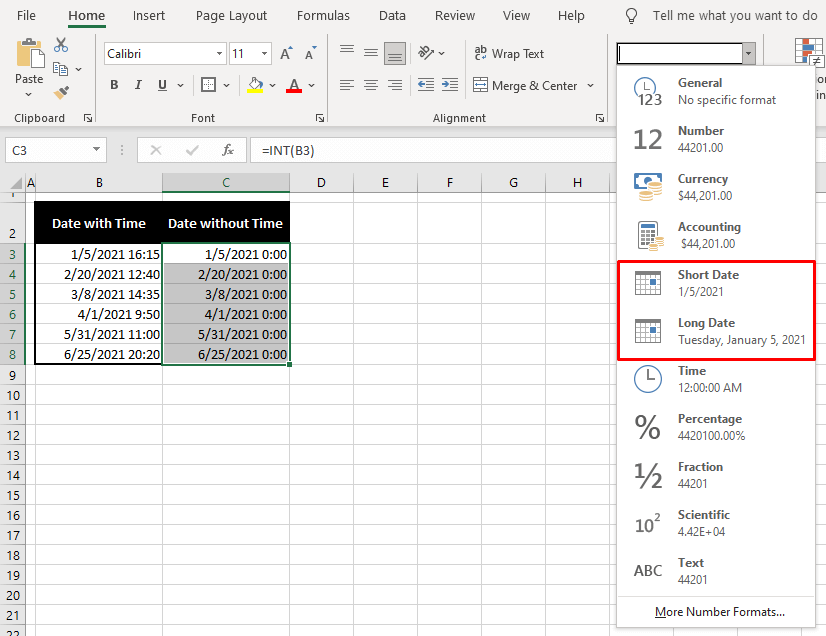
- Select all the cells resultant from the INT function.
- From the Home tab, in the Number section, click on the bar reading Custom to change the format of the cells. Select either of the two date options, Short Date being most common.
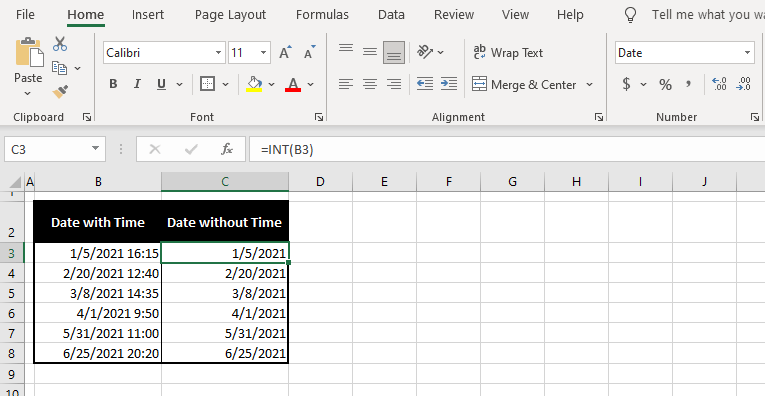
With the changed format, the time has been completely removed, leaving the dates:
Using the DATE Function with DAY, MONTH & YEAR
The DATE function returns a date in dd-mmm-yyyy format from the individually supplied year, month, and day. We will add in the YEAR, MONTH, and DAY functions in place of the year, month, and day, nesting them within the DATE function, feeding the 3 functions with the timestamp to extract the date and ignore the time. Let’s see the formula to do this.
=DATE(YEAR(B3),MONTH(B3),DAY(B3))The YEAR, MONTH, and DAY functions have been supplied with the timestamp in B3 to extract the year, month, and day. The year, month, and day are then passed onto the DATE function which arranges them into a date format dd-mmm-yyyy.
The results are returned with the time from the timestamp addressed as 0. Dates in Excel are stored as an integer and time as a decimal. Now that the decimal has been converted to 0, the time is displayed in the results as 0:00.
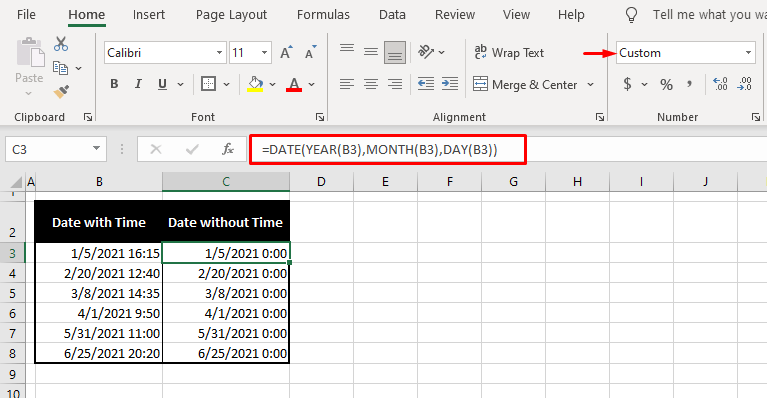
From here on, the format can be converted to a date format to remove the time completely. This is done by heading to the Number section in the Home tab. Click on the little arrow on the bar to see the list of formats and select a date format of your liking. We’ll go with the regular Short Date format.
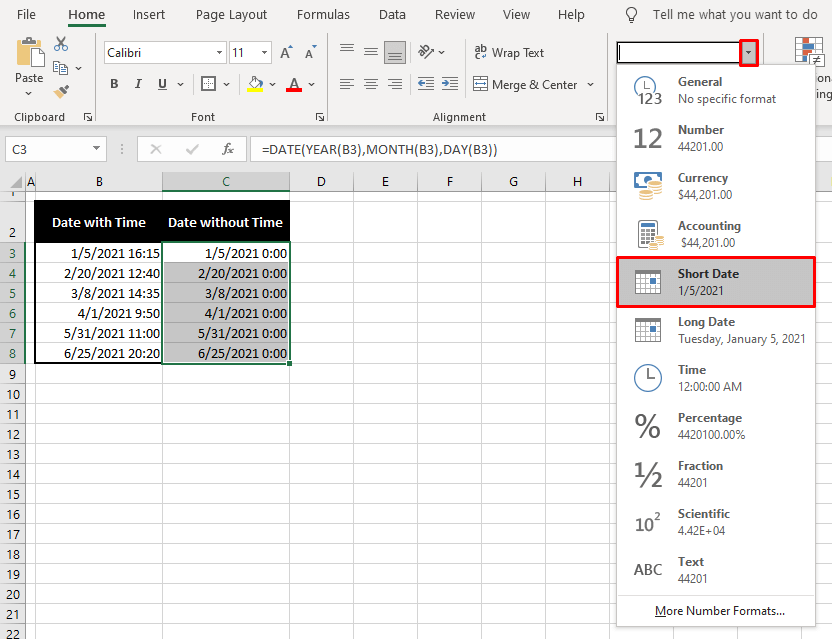
The format applied removes the time and shows the date:
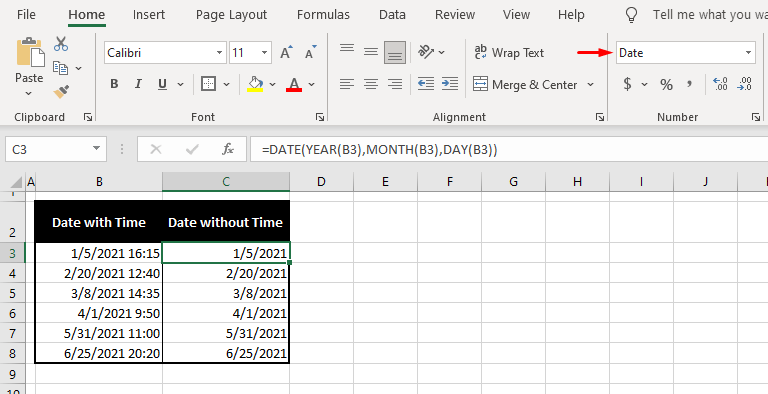
Using the TEXT Function
The TEXT function converts a value to text in a specific number format. This way, we can get the TEXT function to convert the timestamp into a date in our choice of date format. This is the formula we will use to remove the time from the timestamp:
=TEXT(B3,"dd/mm/yyyy")In this formula, the TEXT function has been given the timestamp in cell B3 as the value to convert. The TEXT function picks the date from the timestamp and returns it according to the format supplied in the second argument (which in our case is dd/mm/yyyy).
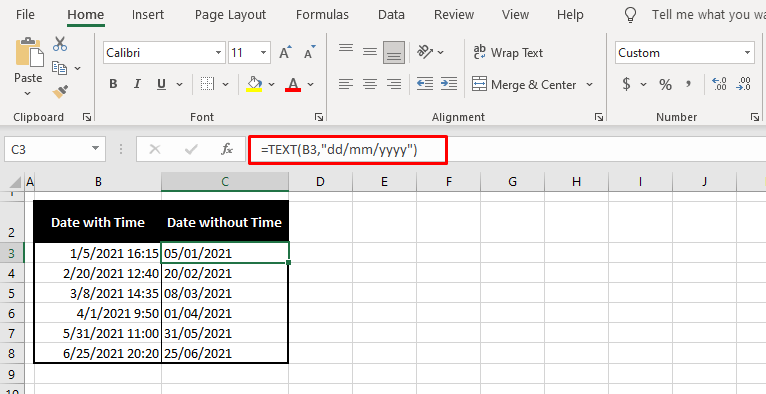
While this formula is the most straightforward, do note that the results are aligned to the left of the column instead of the right. This means that the results are in text format instead of date format (number formats automatically align to the right), thanks to the TEXT function. Using the TEXT function, you don’t need to change the format as with other functions but it does mean that the final result won’t be a number format but a text format.
Remove Time from Date Using Find and Replace
The Find and Replace feature can be used to remove the time from the timestamp along with date formatting. Find and Replace can be used to devalue the time which can then be formatted out of the timestamp. Here are the steps to do this:
- Select all the timestamps from which you want the time removed.
- Go to Home tab > Find & Select button > Replace… option or press Ctrl + H to open the Find and Replace dialog box.
- In the Find what field, type a space character and an asterisk "*".
- This will only work if the date and time in the timestamp are separated by a single space character.
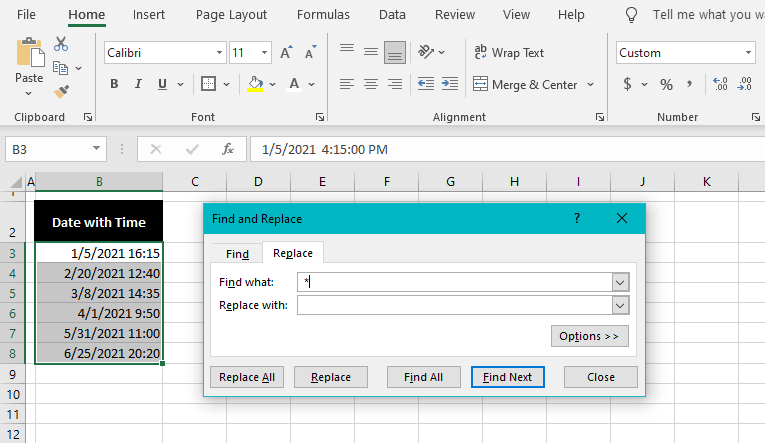
- Select Replace All.
- Click OK on the popup and close the Find and Replace dialog box.
- Now the time part of the timestamp has changed to 0:00, as the time has been replaced with nil value i.e. 0. Format the cells to a date format to remove the time completely.
- Use the format bar in the Home tab to change the format from Custom to a date format.
We’re selecting Short Date.
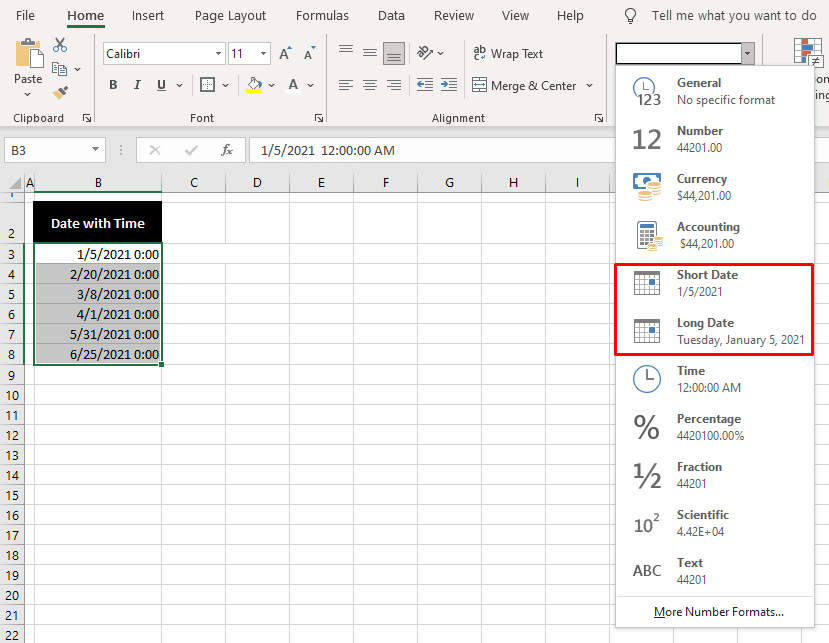
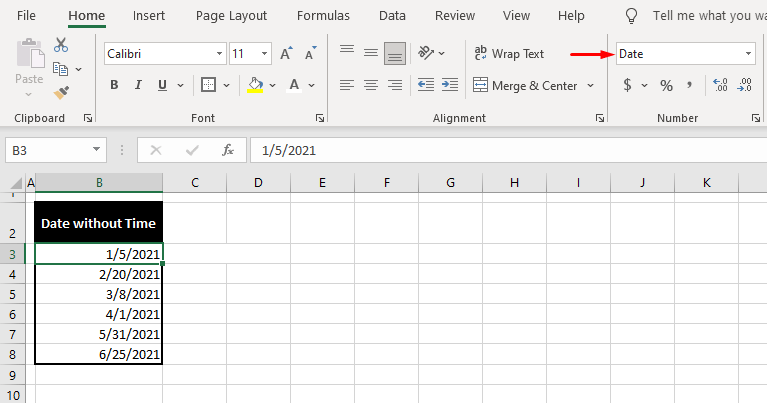
These steps will leave only the date on display:
Remove Time from Date Using Text to Columns
This method of removing the time from the timestamp to single out the date involves the Text to Columns feature. Using the Text to Columns wizard, we will separate time from the date as a column and nullify the value of the time to 0. Henceforth, the format of the cell can be changed to solely display the date. Below we have the steps for this:
- Select all the cells with timestamps.
- In the Data tab, select the Text to Columns button from the Data Tools section to launch the wizard.
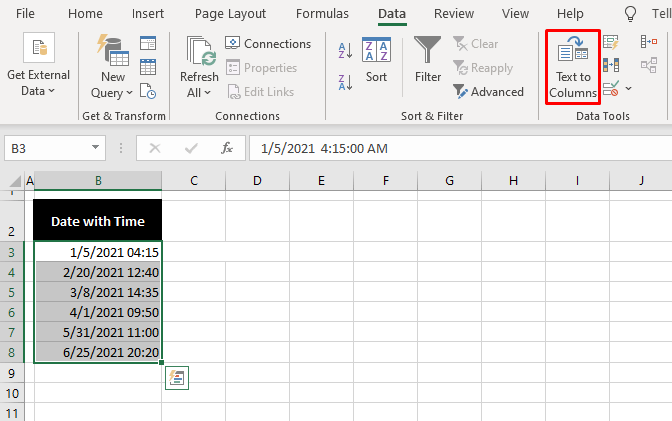
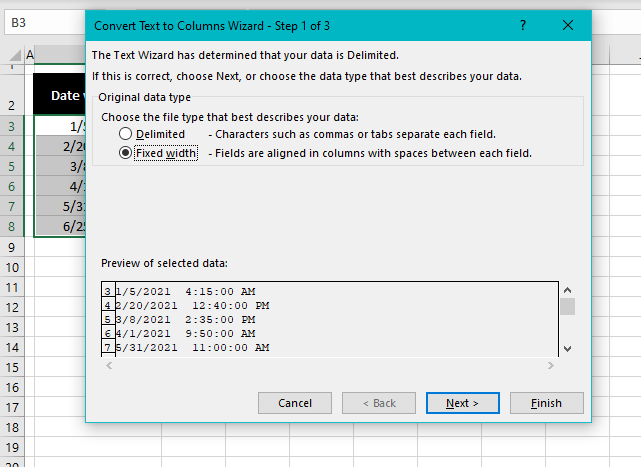
- In step 1, select the Fixed width radio button.
- Click Next.
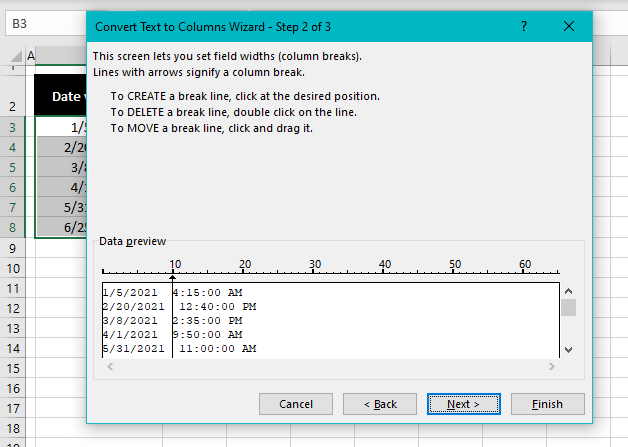
- In step 2, set the vertical break line between the date and time.
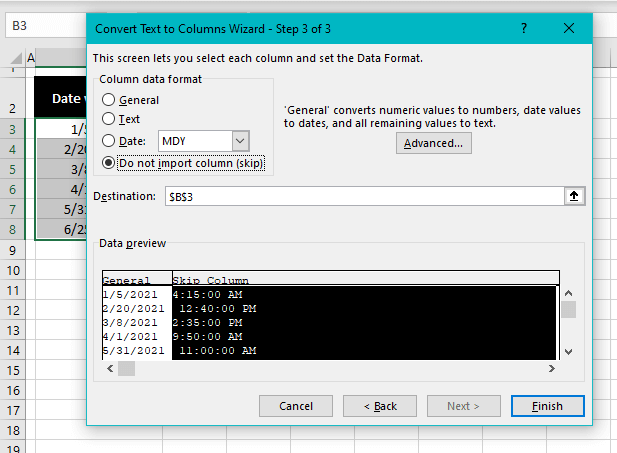
- In step 3, select the column with time. Also, select the Do not import column (skip) radio button. We select this option as we want the selected column (time column) to be skipped from appearing in the results.
- Click Finish.
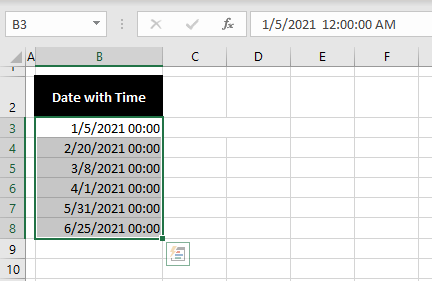
- The time has now been separated as 0 which shows up as 0:00 in line with the timestamp format.
- Finally, the format of the cells can be changed to show just the date.
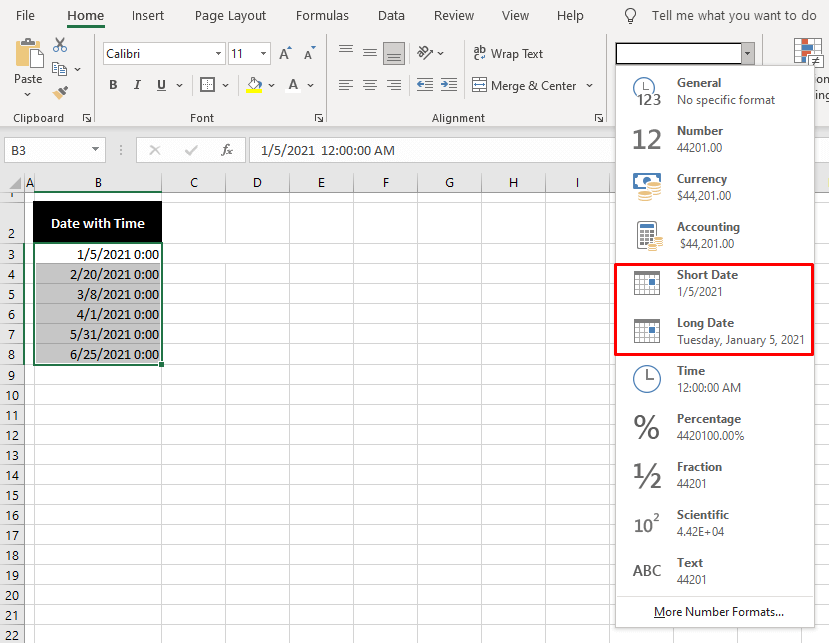
- In the Home tab, use the drop-down in the format bar in the Number
Choose a date format from the list, like Short Date.
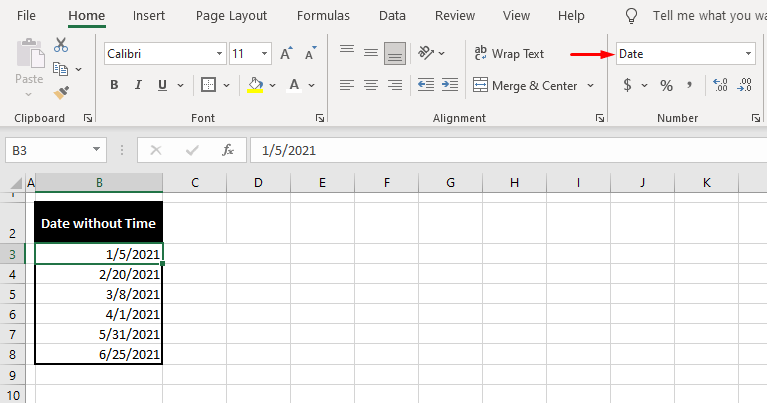
There we have the date without the time:
Remove Time from Date Using Formatting Cells
Although this method is the quickest, you might wonder why we have mentioned it right at the end of this guide. Formatting cells change the format of the cells which means that the time will be hidden and not removed. If that works for you, here’s how to do it:
- Select all the timestamp cells.
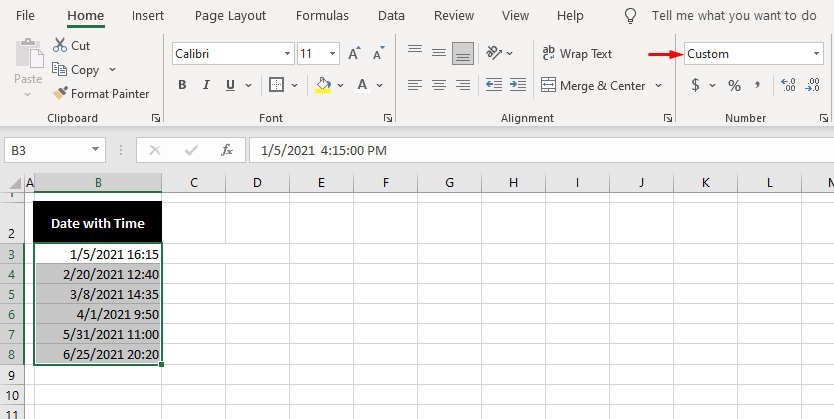
- Change the format of the cells to Short Date from the Home tab > Number section > Number Format bar, Short Date.
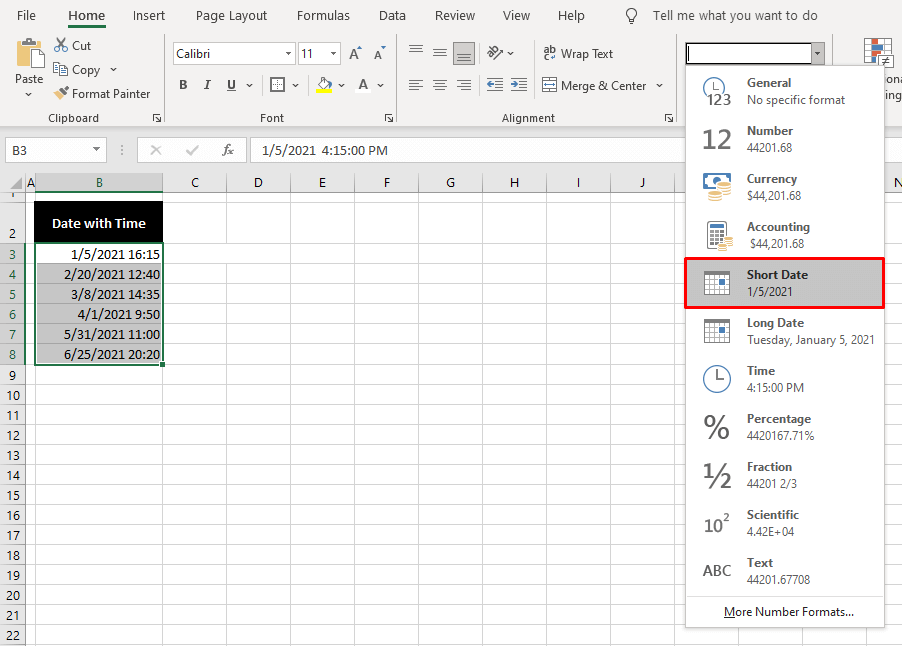
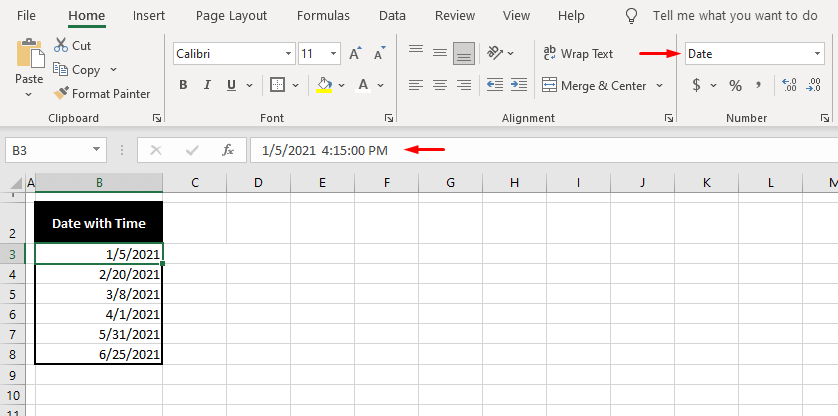
The time has been hidden, displaying the date. You can see in the formula bar that the time part is still present.
It’s time for a close. By now you may have sifted through a few methods of removing the time from the date/timestamp and their pros and cons. We are certain you’ll find something for your date-stamping. We’re coming with more Excel stamping that you better not miss! Double cheers to learning!


